Introduction to Advertica
Based in the vibrant hub of Bratislava, Slovakia, Advertica has been at the forefront of the advertising industry since 2012, shaping digital landscapes and empowering publishers globally. Dive into the future of monetization with our comprehensive suite of services tailored to maximize your website's potential.
Our mission
At Advertica, we are redefining excellence as the premier choice for advertisers seeking unparalleled revenue potential. Our innovative platform empowers publishers to thrive in a competitive landscape, setting us apart from other ad networks and establishing our reputation as the best company for ads.
Since our founding in 2012, we have consistently delivered outstanding results to our partners, earning their trust through reliability and unwavering support. Our mission is not merely to offer an alternative but to revolutionize digital advertising by providing cutting-edge solutions tailored specifically to your needs. Choose Advertica for a partnership that drives success and sets the standard in the industry.
Overview and key features
Traffic Monetisation
We truly appreciate the impact of every click, impression, and conversion. Our publishers have the opportunity to explore cutting-edge monetization methods, embracing the traditional CPM, CPC, and CPA models. Whether you're a seasoned pro or just starting out, we've got the resources to drive your success with a touch of personalization.
Explore a spectrum of ad formats to captivate your audience. From traditional Banner Ads (160x600, 300x250, 468x60, and more) to PopUp, PopUnder, TabUp, TabUnder, Redirect, and Direct Link Ads, we provide a versatile range to suit every niche. We also offer Push Notification Subscription monetisation ad tags.
Our Publisher User Interface
Maximize your success using our user-friendly publisher interface. Discover a wealth of information and statistics, ranging from comprehensive traffic insights to detailed reports. Enjoy the ability to effortlessly analyze your website's performance, monitor daily metrics, and access country-specific reports.
Flexible payment options
Enjoy the flexibility of choosing between daily, weekly or monthly payments. Choose your preferred method of revenue transfer, be it traditional channels like International Bank Wire and Payoneer, or embrace the future with crypto payments in Bitcoin, Ethereum, Dogecoin, Litecoin, Solana, DASH, ZCash, as well as stablecoins like USDC and USDT.
Account Management
Navigate, generate ad tags, optimize and easily access revenue statistics seamlessly through our intuitive publisher user interface.
Account activation process
After registration via our registration page, please check your mailbox for an account activation e-mail. Inside the e-mail there is a link, which after clicking provides your account with an automatic e-mail activation. After that, your account is activated - no other verification is necessary.
Website approval
With Advertica, there is no need to manually ask for approval of publisher domains/websites. Once you place our ad tags on your website, our system does the magic for you, and automatically assigns the website to your account. There is no approval needed - your website will start earning right away!
E-mail notifications
Our system automatically sends out e-mails in the following cases:
- Payment Request Created
- Payment Request Cancelled
- Payment Sent
- General Information Update
- Billing Information Update
- Declined Conversions
By default all of these notifications are on. You can turn any of them off anytime in your publisher account settings.
In case you have enabled Direct Offers, you will also receive updates about any campaign changes that occur. The default setting is to send campaign updates at the exact time that they occur, but you can set it to getting a single e-mail daily/every 6 hours with all changes or you can disable these notifications (we don't recommend it in order to avoid any potential loss).
Setting up S2S callback tracking
Server-to-Server (S2S) callback tracking is a method of sharing data about conversions/clicks/impressions from one server to another. It is especially helpful to Ad Networks, which need the specific data represented in their own system.
We have developed a powerful S2S callback tracking interface which guides you to use the correct format to receive realtime calls from our server with the data about conversions that your traffic generates.
Currently our system supports the following methods of s2s tracking:
- Conversion tracking (CPA)
- Click tracking (CPA)
- CPM/CPC tracking
S2S Conversion Tracking
The URL you enter into the target callback URL field is the one that will be called, including all variables that are specified in the URL. The URL will be called on every visitor conversion.
IMPORTANT: In order to capture CLICK ID hash, or any other custom variable you want to use, you have to add it into your ad tag URL first (for example in case of direct link it's https://r-q-e.com/692fdb6320e7c8ac4d37/b1952b0722/?placementName=default&cv=YOUR-CLICKID-VARIABLE)
Available tokens for S2S conversion tracking
Here you can find a list of all variables that are supported by our system. You can use and mix any of them in any order you want.
For most Ad Networks the best practise is adding the CLICK ID variable into the generated ad tag (as specified above) and setting your S2S URL with the following variables:
http://mysite.com/s2s.php?clickid=[cv]&payout=[usd_price]
This ensures you can match each click id hash on your end and get the accurate data about the total price of each conversion.
S2S Click Tracking
Click tracking works in a similar way as Conversion tracking. Every time there is a click produced from your traffic on a CPA campaign, our server will make a call to your specified target callback URL with the tokens you entered.
In order to use click tracking, enter your designated callback URL and append the necessary variables.
IMPORTANT: In order to capture CLICK ID hash, or any other custom variable(s) you want to use, you have to add it into your ad tag URL first (for example in case of direct link it's https://r-q-e.com/692fdb6320e7c8ac4d37/b1952b0722/?placementName=default&cv=YOUR-CLICKID-VARIABLE)
Available tokens for S2S click tracking
You can use the [cc] and [cv] tokens. Same as with Conversion tracking, most Ad Networks the best practise is adding the CLICK ID variable into the generated ad tag (as specified above) and setting the S2S Click Tracking URL with the following variables:
https://mysite.com/s2s.php?type=click&clickid=[cv]
This ensures you can match each click id hash on your end and get the accurate data.
S2S CPM/CPC Tracking
Our system is running CPM and CPC campaigns as an addition to CPA campaigns - you can use this method of S2S callback in order to track results from those earning methods.
This method of tracking is different from the previous two - once a day our server will make a call to your specified URL with the tokens you entered. In order to use CPM/CPC Tracking, enter your designated callback URL and append the necessary variables.
CPM/CPC Tracking is not sent the same day because the data is recalculated every day for the day before, therefore once the data is recalculated, the callback is made - around 06:00 - 08:00 am NYC time.
Custom domain setup
By default, every publisher that registers uses the same domain to send traffic to. That domain then redirects to one of many rotating domains in order to prevent any traffic outages due to Google SafeBrowsing and similar.
However, to ensure proper service, it is recommended to use a custom domain that is unique to your account. You can get one assigned from us for free in your "My Account" settings, just choose one that suits you from our list and click on the "Send Request" button. You will have the custom domain assigned instantly.
Earning with Advertica
Earnings
Our publishers can use several methods on our ad network in order to earn revenue from their traffic.
- Traditional ad formats
- Push notification subscription monetization
- File download monetization
[CPM + CPC + CPA] Traditional ad formats include:
- Banner Ads (300x250, 728x90, 468x60, 160x600, 120x600, 300x50, Responsive)
- PopUp, PopUnder, TabUp, TabUnder Ads
- Redirect Ads
- Direct link Ads
[CPS] Push notification subscription monetization is achieved using javascript code along with a service worker file that automatically displays the subscription window to the website's visitors and the publisher is paid for every subscriber dynamically. We hold push notification earnings for 7 days before they are available to be withdrawn - implemented in order to prevent bots generating and withdrawing fraudulent revenue.
Payments
You can set your preferred account currency to either USD, GBP or EUR. Take control of your payments by pausing or activating them, and adjust the frequency from daily to weekly or monthly (NET30) payments. Define your minimum payment threshold, starting from $10 to any desired amount. On the right side of the screen, you can select your preferred payment method and input the corresponding address to receive payments hassle-free.
Please make sure to fill out the necessary details in order to receive payments from us automatically.
Generating Ad Tags
Generating ad tags has never been easier thanks to our simple yet powerful Ad Tags generator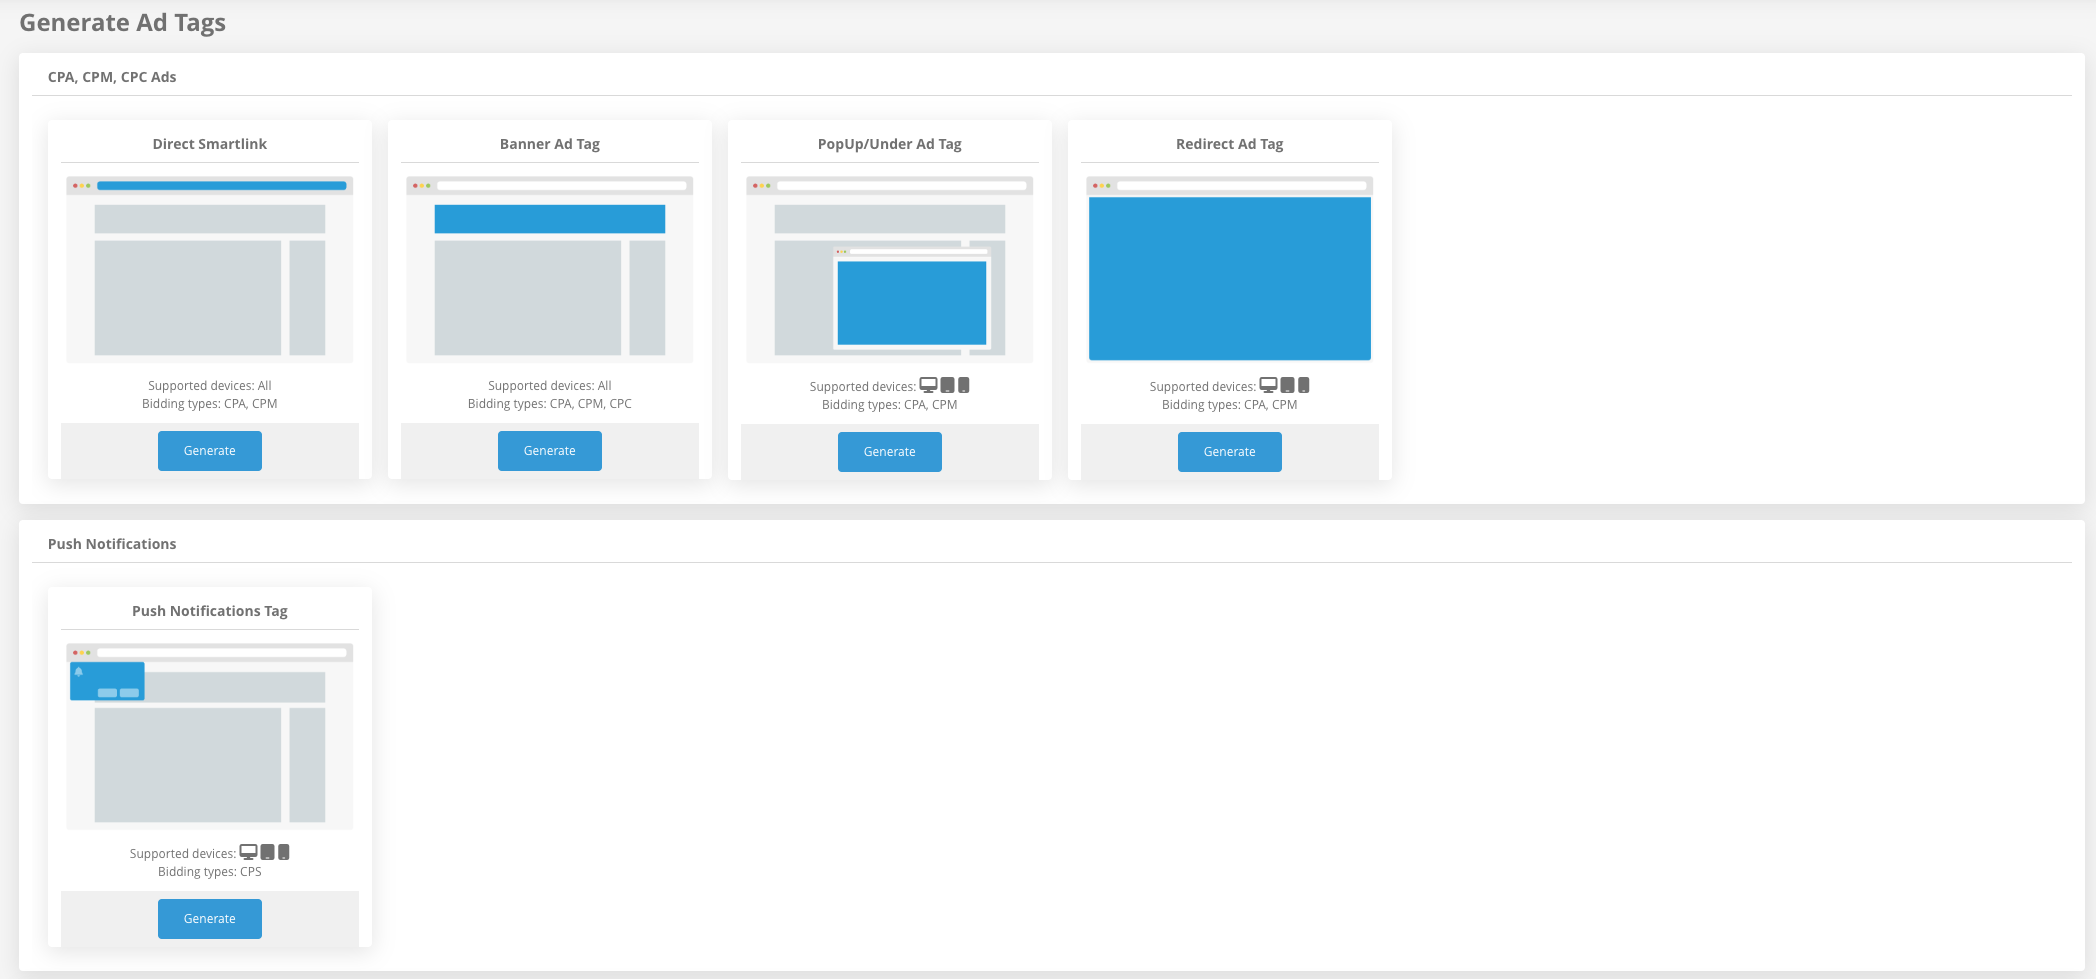
After choosing the specific ad format you want to use and clicking the "Generate" button, you get the option to enter a Placement name. 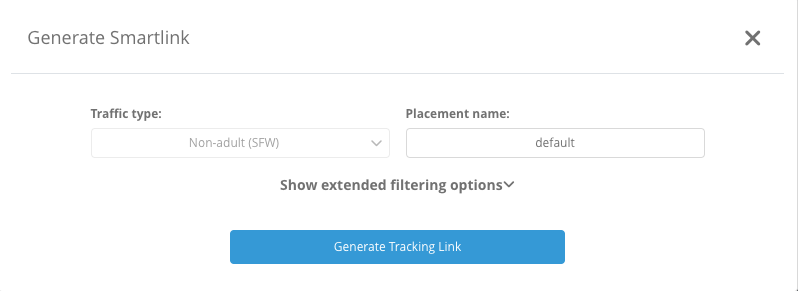
The Placement Name is intended for our publishers to be able to differentiate between two or more different banner positions that have the same size (for example). All ad urls contain the Placement name variable, so in your traffic reports, you are able to filter/group by Placement names.
Clicking on "Show extended filtering options" will show additional options you can choose to block certain Campaign categories, types, or Landing page types. Revenue-wise, we recommend to leave all fields allowed.
Proceeding further using the "Generate Tracking Link" button, the Ad Tag/Tracking Link will appear, along with an option to select a custom domain (in case you have one assigned, you have to select it).
How to use Ad Tags
Using our Ad Tags is very simple:
- Direct smartlink ad tags use depends on your own use-case. For example, you can use your own banners to link to the target URL.
- Banner ad tags are to be placed in the part of your code where it is supposed to be displayed
- Pop/Tab/Redirect ad tags are to be placed inside the <head> </head> part of your code
- Push notification subscription ad tags require you to download the sw.js file and upload it to the root directory of your website (it has to be accessible on https://your-website.com/sw.js) and also place the code inside <head> </head>
Placing Banner Ad Tags - WordPress
There are many ways that publishers can use our advertisements in their WordPress website. It also depends on what kind of theme the publisher decides to use on their WordPress website.
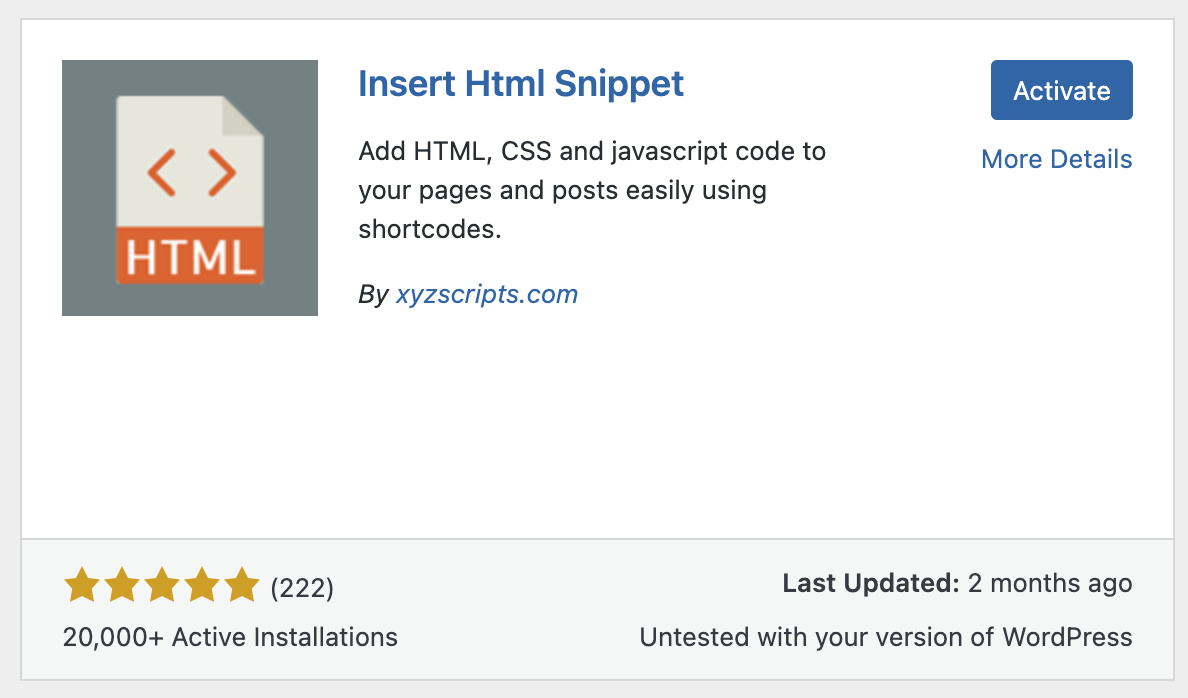
We recommend using a plugin to automate, instead of pasting the ad code manually on every article. To do this, we can use the free plugin Insert HTML Snippet by XYZScripts.
- Open the Plugin Installer from inside your WP installation (usually
yourdomain.com/wp-admin/plugin-install.php) - Search for "Insert HTML Snippet" and make sure you found the one from XYZScripts

- Press "Install Now" and then "Activate"
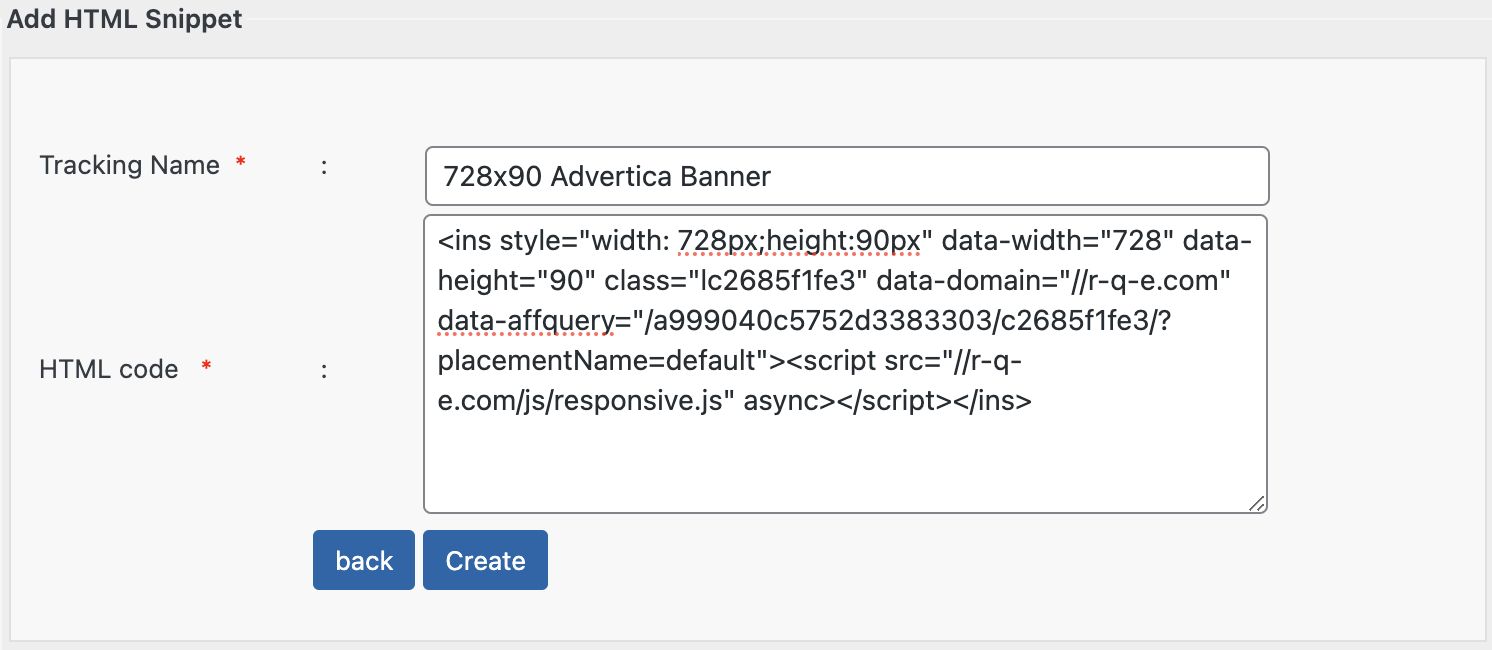
- In your WP menu, click "XYZ Html" -> "HTML Snippets"
- Click on "Add New HTML Snippet"
- Fill tracking name to your liking - for example "728x90 Advertica Banner"
- Fill HTML code with the code you have generated in our Ad Tags Generator
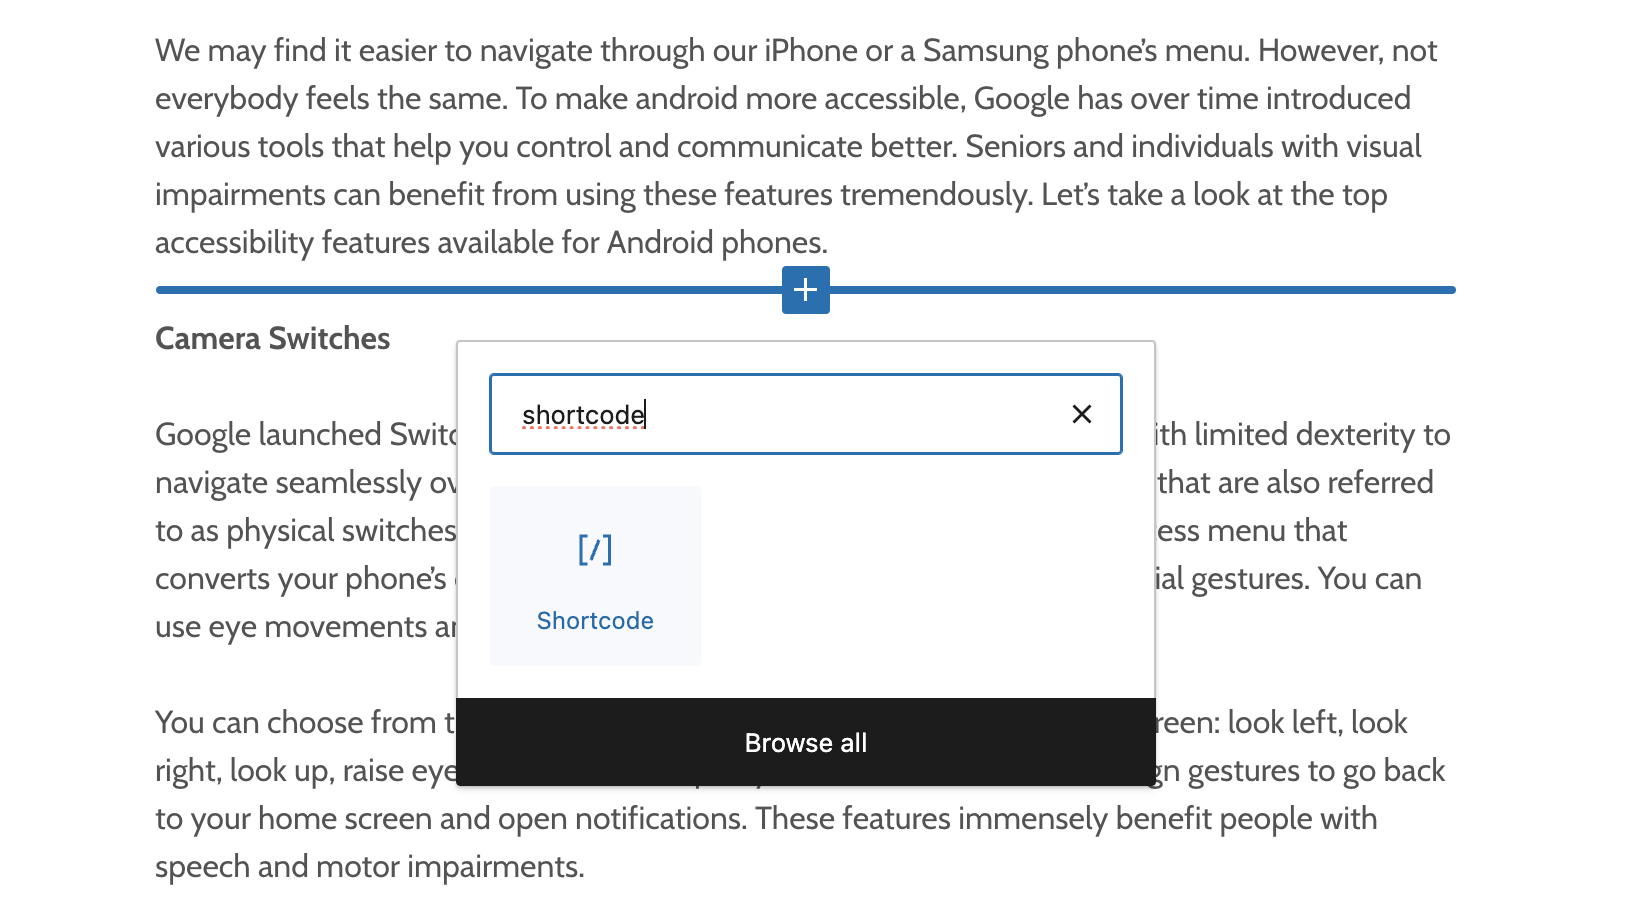
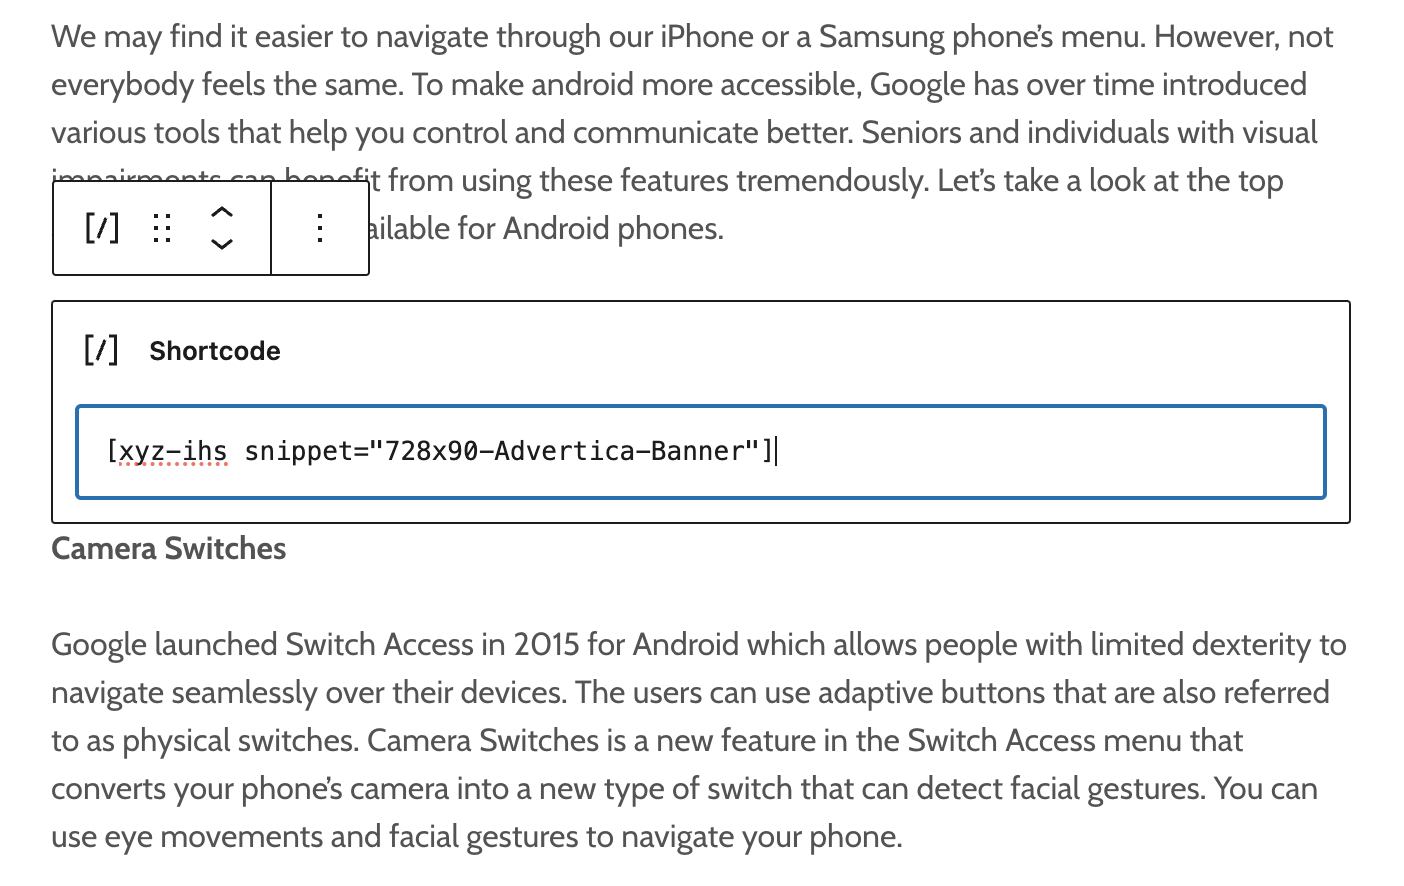
- Click on "Create" and copy the shortcode of your created snippet (in this case it's
[xyz-ihs snippet="728x90-Advertica-Banner"] - Now, you can open any post or page in your WP installation and add a new shortcode block
- Publish/Update your post/page and now your visitors will be able to see our advertisements wherever you placed the shortcode

Placing Banner Ad Tags - Blogger/Blogspot
1. Click on "Layout" in the left menu inside your Blogger interface
2. Click on "Add a Gadget" inside "Sidebar (Top)" or "Sidebar (Bottom)"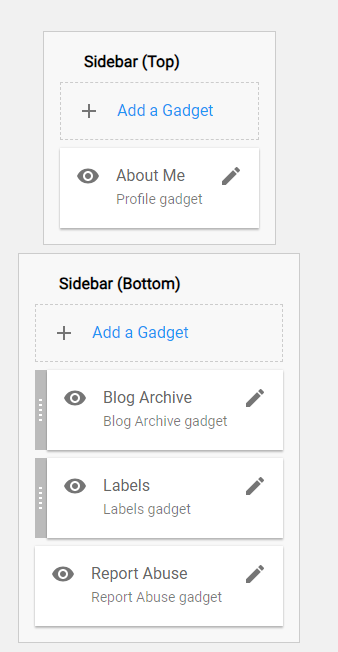
3. Click on "HTML/Javascript"
4. Enter the Title (can be empty) and paste the generated Ad Tag into "Content"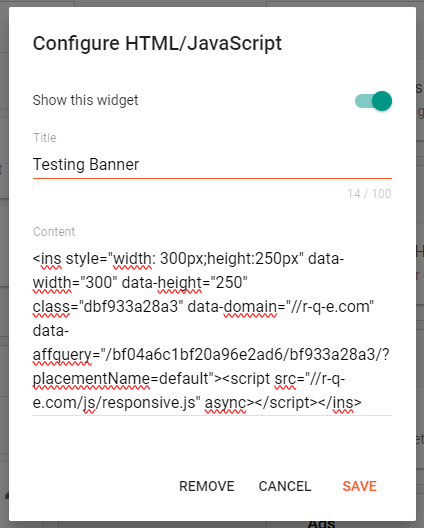
5. Click on "Save"
Placing Pop, Redirect Ad Tags - Blogger/Blogspot
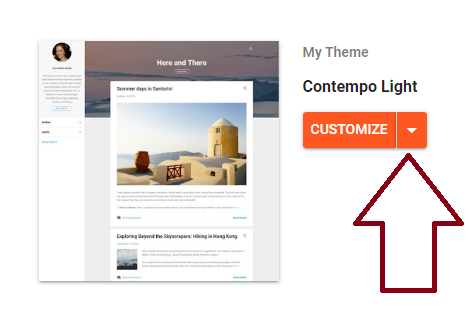
- Open "Theme" in the left menu
- Click on the arrow next to the “Customize” button
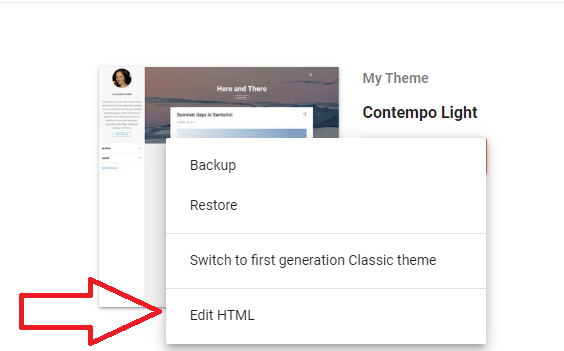
- Then click on “Edit HTML”
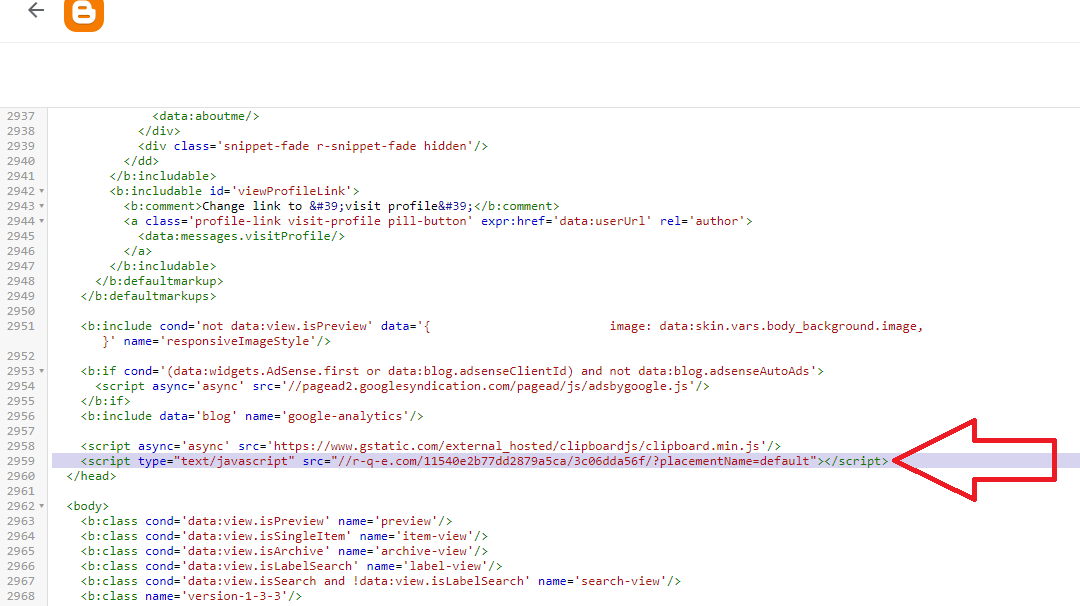
- Find the "</head>" tag and insert the generated AdTag in front of it and save

Affiliate program
With our affiliate program, our publishers get a 2.5% bonus from every conversion that their referral's traffic generates.
You can generate referral banners in your account.
Forbidden traffic
As is the industry standard, we don't accept fraudulent traffic - the following offenses will lead to your account getting banned and/or payment refused:
- Autosurf/Manualsurf traffic
- Botted impressions/clicks/conversions
- Adult (18+) content
- Gambling (18+) content
- Any other type of fraudulent method of earning
Getting paid with Advertica
Payment methods available
| Payment method | Minimum payment | Our fees | * Payment method fees | Network | |
| PayPal | $10.00+ | $0.00 | PayPal Fees: 0.35 USD + 5.5% | paypal.com | |
| Payoneer | $50.00+ | $0.00 | Payoneer Fees: up to 3% of payment received | payoneer.com | |
| Bank Wire | $100.00+ | Payments under $250.00: $10.00 Fee | Fees of your bank: We strongly recommend you to use bank wire payments for payments above $1000. | International Bank Wire | |
| SOL (Solana) | $5.00+ | $0.00 | $0.00 | Native Solana | |
| DOGE (Dogecoin) | $5.00+ | $0.00 | $0.00 | Native Dogecoin | |
| | LTC (Litecoin) | $5.00+ | $0.00 | $0.00 | Natve Litecoin |
| DASH | $5.00+ | $0.00 | $0.00 | Native DASH | |
| | ZEC (Zcash) | $5.00+ | $0.00 | $0.00 | Native Zcash |
| | USDC | $5.00+ | $0.00 | $0.00 | Polygon POS |
| | USDT | $10.00+ | Payments under $50.00: $2.00 Fee Payments over $50.00: $0.00 Fee | $0.00 | Native Ethereum Native Tron |
| | BTC (Bitcoin) | $10.00+ | Advertica Fees: Payments under $50.00: $2.00 Fee Payments over $50.00: $0.00 Fee | $0.00 | Native Bitcoin |
| | ETH (Ethereum) | $20.00+ | Advertica Fees: Payments under $50.00: $2.00 Fee Payments over $50.00: $0.00 Fee | $0.00 | Native Ethereum |
Payment schedule
We offer the following payment schedules to our publishers:
Daily payments
Every day a payment request is generated on the user account as long as the minimum payment threshold was met.
Weekly payments
Every monday a payment request is generated on the user account as long as the minimum payment threshold was met.
Monthly payments (NET0)
Every month after the month is finished, a payment request is generated on the user account as long as the minimum payment threshold was met.
Monthly payments (NET30)
30 days after the month is finished a payment request is generated on the user account as long as the minimum payment threshold was met.